
A Guide to working with Excel files in Golang - Excelize
Introduction to Excelize
Excelize is a Go library for reading and writing files generated by programs such as Microsoft Excel, LibreOffice Calc, and Google Sheets or any other file conforming to the Office Open XML Spreadsheet (OOXML) standard. It handles files with extensions such as xls, xlsx, xlsm, xltm and other extensions.
In this guide, we will learn how to work with Excel files in Golang using Excelize. This guide covers reading, writing, and manipulating data, with code examples.
Installation
To install the package, run the following command:
go get github.com/xuri/excelize/v2Creating a new Excel file
To create a new Excel file, you can use the NewFile() function. This function returns a pointer to a new File object which is the main object of the Excelize library. It provides methods for creating and manipulating Excel files.
package main

import (
 "fmt"
 "log"

 "github.com/xuri/excelize/v2"
)

func main() {
 file := excelize.NewFile()

 headers := []string{"ID", "Name", "Age"}
 for i, header := range headers {
        file.SetCellValue("Sheet1", fmt.Sprintf("%s%d", string(rune(65+i)), 1), header)
    }

 data := [][]interface{}{
        {1, "John", 30},
        {2, "Alex", 20},
        {3, "Bob", 40},
    }

 for i, row := range data {
 dataRow := i + 2
 for j, col := range row {
            file.SetCellValue("Sheet1", fmt.Sprintf("%s%d", string(rune(65+j)), dataRow), col)
        }
    }

 if err := file.SaveAs("students.xlsx"); err != nil {
        log.Fatal(err)
    }
}In this example, we create a new Excel file and add some data to it. The SetCellValue() function is used to set the value of a cell. The first argument is the name of the sheet and the second argument is the cell reference. Finally, the third argument is the value to be set. The SaveAs() function is then used to save the file to disk.

To create a new sheet, you can use the NewSheet() function. This function takes the name of the new sheet as an argument.
file.NewSheet("Sheet2")And to set the active sheet, you can use the SetActiveSheet() function. This function takes the index of the sheet as an argument.
index := file.NewSheet("Sheet2")
file.SetActiveSheet(index)Inserting rows and columns
To insert a row, you can use the InsertRow() function. This function takes the name of the sheet, the row number, and the number of rows to be inserted as arguments.
file.InsertRows("Sheet1", 1, 1)We can also insert a column by using the InsertCol() function. This function takes the name of the sheet, the column name, and the number of columns to be inserted as arguments.
file.InsertCol("Sheet1", "J", 3)Merge cells
Cells can be merged using the MergeCell() function. This function takes the name of the sheet, the start cell reference, and the end cell reference as arguments.
file.MergeCell("Sheet1", "A1", "J1")

file.SetCellValue("Sheet1", "A1", "Students Report")Reading an Excel file
To read an Excel file, you can use the OpenFile() function. This function takes the path to the file as an argument and returns a pointer to a new File object from which you can read the data.
package main

import (
 "fmt"
 "log"

 "github.com/xuri/excelize/v2"
)

func main() {
 file, err := excelize.OpenFile("students.xlsx")
 if err != nil {
        log.Fatal(err)
    }

 rows, err := file.GetRows("Sheet1")
 if err != nil {
        log.Fatal(err)
    }

 for _, row := range rows {
 for _, col := range row {
            fmt.Print(col, "\t")
        }
        fmt.Println()
    }
}From the File object, there is GetRows() function that returns a slice of rows from a given sheet.
To get the value of a cell, you can use the GetCellValue() function which takes the name of the sheet and the cell reference as arguments.
value := file.GetCellValue("Sheet1", "A1")Performing calculations
To perform calculations, you can use the SetCellFormula() function. This function takes the name of the sheet, the cell reference, and the formula as arguments.
package main

import (
 "fmt"
 "log"

 "github.com/xuri/excelize/v2"
)

func main() {
 file, err := excelize.OpenFile("students.xlsx")
 if err != nil {
        log.Fatal(err)
    }

 rows, err := file.GetRows("Sheet1")
 if err != nil {
        log.Fatal(err)
    }


for i, _ := range rows {
 // skip the title, and header
 if i == 0 || i == 1 {
 continue
        }

        file.SetCellFormula("Sheet1", fmt.Sprintf("H%d", i+1), fmt.Sprintf("SUM(B%d:G%d)", i+1, i+1))
        file.SetCellFormula("Sheet1", fmt.Sprintf("I%d", i+1), fmt.Sprintf("AVERAGE(B%d:G%d)", i+1, i+1))
    }

 if err := file.SaveAs("students.xlsx"); err != nil {
        log.Fatal(err)
    }
}In this example, we calculate the total and average of the scores of each student. The SetCellFormula() function is used to set the formula for each cell.
Formatting cells
Cells can be formated using the SetCellStyle() function. This function takes the name of the sheet, the cell reference, and the style as arguments.
import (
 "log"

 "github.com/xuri/excelize/v2"
)

// Style the file
func main() {

 file, err := excelize.OpenFile("students.xlsx")
 if err != nil {
        log.Fatal(err)
    }

 style, err := file.NewStyle(
 &excelize.Style{
            Alignment: &excelize.Alignment{Horizontal: "center"},
            Font:      &excelize.Font{Bold: true, Color: "FF0000"},
            Border: []excelize.Border{
                {Type: "left", Color: "00FF0000", Style: 1},
                {Type: "right", Color: "00FF0000", Style: 1},
                {Type: "top", Color: "00FF0000", Style: 1},
                {Type: "bottom", Color: "00FF0000", Style: 1},
            },
            Fill: excelize.Fill{
                Type:    "pattern",
                Color:   []string{"#DDEBF7"},
                Pattern: 1,
            },
        },
    )
 if err != nil {
        log.Fatal(err)
    }

 styleTitle, err := file.NewStyle(&excelize.Style{
        Fill: excelize.Fill{
            Type: "pattern",
 // navy blue
            Color:   []string{"#000080"},
            Pattern: 1,
        },
        Font:      &excelize.Font{Bold: true, Color: "FFFFFF"},
        Alignment: &excelize.Alignment{Horizontal: "center"},
    })

    file.SetCellStyle("Sheet1", "A1", "I5", style)
    file.SetCellStyle("Sheet1", "A1", "I1", styleTitle)

 if err := file.Save(); err != nil {
        log.Fatal(err)
    }
}In the example above, we use the NewStyle() function to create a new style. This function takes a pointer to a Style object as an argument. The Style object has the following fields:
Alignment- Alignment of the text in the cell.Border- Border of the cell.Fill- Fill the color of the cell.Font- Font of the text in the cell.Protection- Protection of the cell.
The SetCellStyle() function is used to set the style of a cell or a range of cells.

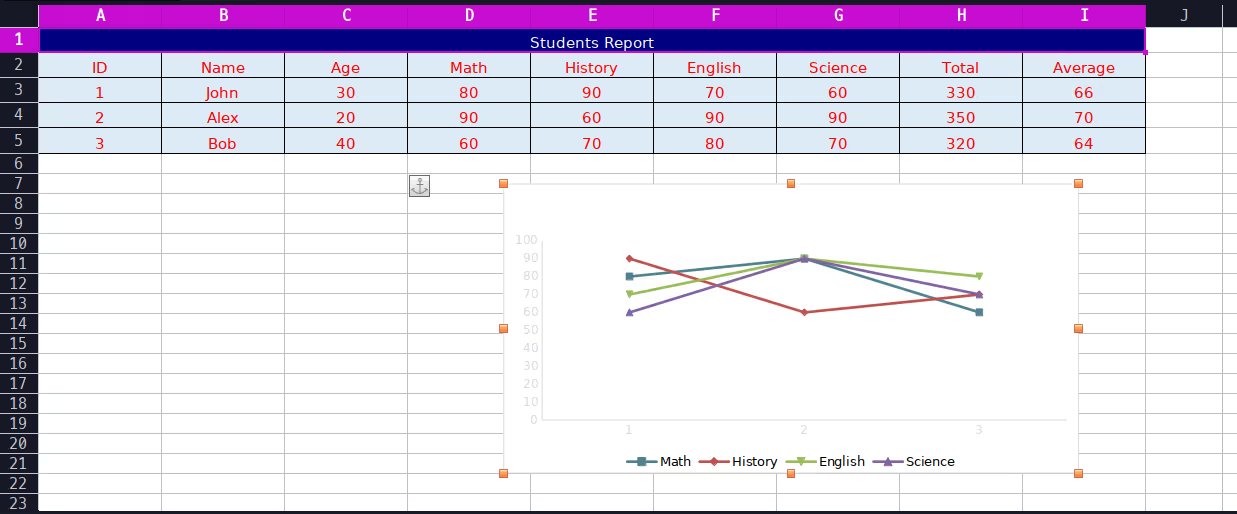
Inserting Charts
Charts can be inserted using the AddChart() function. This function takes the name of the sheet, the cell reference and a Chart object pointer as arguments.
package main

import (
 "log"

 "github.com/xuri/excelize/v2"
)

func main() {
 file, err := excelize.OpenFile("students.xlsx")
 if err != nil {
        log.Fatal(err)
    }

 if err := file.AddChart("sheet1", "h5", &excelize.Chart{
        Type: "line",
        Series: []excelize.ChartSeries{
            {
                Name:       "sheet1!$D$2",
                Categories: `sheet1!$A$3:$A$5`,
                Values:     `sheet1!$D$3:$D$5`,
            },
            {
                Name:       "sheet1!$E$2",
                Categories: `sheet1!$A$3:$A$5`,
                Values:     `sheet1!$E$3:$E$5`,
            },
            {
                Name:       "sheet1!$F$2",
                Categories: `sheet1!$A$3:$A$5`,
                Values:     `sheet1!$F$3:$F$5`,
            },
            {
                Name:       "sheet1!$G$2",
                Categories: `sheet1!$A$3:$A$5`,
                Values:     `sheet1!$G$3:$G$5`,
            },
        },
    }); err != nil {
        log.Fatal(err)
    }

 if err := file.SaveAs("students.xlsx"); err != nil {
        log.Fatal(err)
    }
}The Type field of the Chart object specifies the type of chart to be inserted. The Series field specifies the data to be used in the chart. And the Categories and Values fields specify the data to be used for the X and Y axes respectively.
Conclusion
In this guide, we have seen how to create an Excel file using the excelize library. We have also seen how to insert data, calculate values, format cells and insert charts. The excelize library is very powerful and can be used to create complex Excel files. To learn more visit the official documentation.