Coding Your Digital Fingerprint: A Developer's Guide
Introduction
So you have built (or acquired) your billion-dollar social application, and you have sold vanity verification badges to the insecure betas. You have even introduced exorbitant API pricing to prevent researchers from accessing your data. But you still want to extract the most out of your users. You have thought of introducing third-party cookies to later sell the data to some broker, but you find out that it is heavily regulated by GDPR and CCPA. “What else can I do?” you ask, “Browser Fingerprinting” I answer.
What is Browser Fingerprinting?
Browser fingerprinting is where a unique identifier is generated based on a computer’s software configuration and hardware specs as they browse the internet. This unique identifier is the “fingerprint”.
How is Browser Fingerprinting possible?
Whenever we visit any website, the browser must provide some information about the current device to that website. This information ranges from your screen resolution, the GPU specs, and your IP address to even devices connected to your device. This information is important to the website as it helps to determine how the content will be served. For instance, your IP will be used to determine whether you can access some data or not on websites like Youtube. In another case, think of a website that uses WebGL (GSAP and Three.js of the world), when rendering the models it has to determine what features to enable like ray tracing, and what frames per second to render among other things.
Efficiency of Browser Fingerprinting
Fingerprinting, when compared to other tracking elements such as cookies, has a lower accuracy. However, given that third-party cookies are heavily regulated, they are currently being used in the industry by most of the major players. The accuracy ranges from 90–99.5%, which is better than not tracking the user at all. To further improve its effectiveness compared to cookies, fingerprinting still works even when a user uses Incognito or a private session.
Why Browser Fingerprinting?
When this concept comes to mind, all you might think of is that it is only used by some nefarious advertisers to serve you ads across the web (and yes, that’s the case), but that is not the only use case of this technology. Another use case is for fraud detection. Let’s consider an example of a bank using this technology. When a user tries to access their online banking account, the bank’s system collects and analyzes the unique fingerprint of the user’s device. If the fingerprint matches a known device associated with the user, the login is allowed. However, if the fingerprint doesn’t match or raises suspicion (e.g., due to unusual geolocation or behavioral patterns), the bank may trigger additional authentication steps, such as sending a one-time code to the user’s registered email or phone, to ensure the login is legitimate and secure.
Other use cases include bot detection (web scraping), analytics, and improving user experience based on the user and device.
There are certain topics we won’t cover here, such as privacy concerns and regulations, among other issues that may be less important to you as a developer (remember, we are after the bag). You can find a great article here that discusses these topics in more depth.
Browser Fingerprinting Methods and Attributes.
There are several elements that it takes to create a fingerprint, below are some of the elements and attributes that are used to create it.
- User Agent string. - The user agent string is a text sent by the browser to the server to identify itself and provide information about the browser and the current device specs. It is part of the HTTP protocol request headers. Example of a user agent string.
Mozilla/5.0 (X11; Ubuntu; Linux x86_64; rv:109.0) Gecko/20100101 Firefox/117.0
HTTP Headers - Various HTTP headers such as Referrer policy andAccept-Language can be used to determine users’ preferences based on their history.
Browser plugins - plugins (extensions) are also exposed to the current site and are used in fingerprinting given that everyone has a diverse type of these extensions.
Canvas Fingerprinting - Canvas is an element used in HTML and allows for creating drawing boards. Websites will run a script to draw an image in the background. With that done the rendered image will give a host of information about the data device such as the graphics hardware. With this information, it creates a “canvas fingerprint”.
Audio Fingerprinting - The AudioContext API is used to measure how a device produces sound and a unique fingerprint is generated based on the device’s hardware.
WebGL Fingerprinting - Similar to Canvas fingerprinting, WebGL capabilities such as the graphics card and driver information, can be used to generate a “WebGL fingerprint”.
TLS Fingerprinting: Analyzing the SSL/TLS handshake and supported cipher suites can provide information about the device.
Connected Devices fingerprinting - This is where any external device connected to your device such as a printer, speaker, etc. is used as attributes and is used to generate a “Connected devices fingerprint”.
Device Motion and Orientation: Data from the Device Motion and Orientation APIs can be used for fingerprinting.
Others include: Installed fonts, Screen resolution, Time zone, Battery status, Keyboard layout, Cookies settings and Supercookies, IP address
All these attributes are then combined to form a unique identifier of every device, which persists across the web.
Building A Browser Fingerprinter
We’ll be using JavaScript as the primary language for this project. You can use any Chromium-based browser or Firefox (Opera and Safari not tested). By the end of this project, you’ll have built a program that produces the following page.
You can find the codebase here on GitHub.
Since everything will be handled on the client side (browser), we’ll not be using some attributes that form a browser fingerprint such as TLS, Accept-Language, and Referrer headers among others. Some attributes mentioned above are out of scope for this project due to their complexity, so we’ll not cover them.
Create a directory and create a file fingerprint.js this file will contain most of the code we’ll be using in this project. Add the following to this file.
// Get User Agent
export const getUserAgent = () => navigator.userAgent;

// Get IP address
export const getIpAddress = async () => {
  try {
    const response = await fetch("https://api.ipify.org?format=json");
    if (response.ok) {
      const data = await response.json();
      return data.ip;
    }
    throw new Error("Failed to fetch IP address");
  } catch (err) {
    throw new Error("Failed to fetch IP address" + err.message);
  }
};

// Get Screen Resolution
export const getScreenResolution = () => {
  return `${window.screen.width} x ${window.screen.height}`;
};

// Get Color Depth.
export const getColorDepth = () => screen.colorDepth;

// Get Available Screen Resolution
export const getAvailableScreenResolution = () => {
  return `${screen.availWidth}x${screen.availHeight}`;
};

// Get Pixel Ratio
export const getPixelRatio = () => window.devicePixelRatio;

// Get time zone offset.
export const getTimezoneOffset = () => new Date().getTimezoneOffset();

// Check if Session Storage is supported
export const getSessionStorage = () => {
  try {
    return !!window.sessionStorage;
  } catch (e) {
    return true;
  }
};

// Check if Local Storage is supported
export const getLocalStorage = () => {
  try {
    return !!window.localStorage;
  } catch (e) {
    return true;
  }
};

// Check if IndexedDB is supported
export const getIndexedDB = () => {
  try {
    return !!window.indexedDB;
  } catch (e) {
    return true;
  }
};

// Check if cookies are supported
export const getCookiesEnabled = () => navigator.cookieEnabled;

//Check if touch is supported
export const getTouchSupport = () => {
  return (
    "ontouchstart" in window ||
    navigator.maxTouchPoints > 0 ||
    navigator.msMaxTouchPoints > 0
  );
};

// Get supported languages
export const getLanguages = () => navigator.languages;

//Check if Tracking Prevention is enabled
export const getDoNotTrack = () => {
  if (navigator.doNotTrack) {
    return navigator.doNotTrack;
  } else if (navigator.msDoNotTrack) {
    return navigator.msDoNotTrack;
  } else if (window.doNotTrack) {
    return window.doNotTrack;
  } else {
    return "unknown";
  }
};

// Get the number of cores.
export const getHardwareConcurrency = () => navigator.hardwareConcurrency;

// Get browser platform
export const getPlatform = () => navigator.platform;

// Get plugins
export const getPlugins = () => {
  return Array.from(navigator.plugins).map((plugin) => plugin.name);
};

// check if pdfViewer is enabled.
export const getPdfViewerEnabled = () => navigator.pdfViewerEnabled;

// check if there are forced colors
export const getForcedColors = () => {
  return window.matchMedia("(forced-colors)").matches;
};As you can see from this code, we are using various browser-based APIs and features to gather device and browser-related attributes. We’ve only used an external API to fetch the IP address since it’s not available directly from the browser.
Moving on, we’ll create a file canvas.js which will contain the code to generate a canvas fingerprint. Add the following code to this file.
// Create a function to generate a canvas fingerprint
export const generateCanvasFingerprint = () => {
  // Create an HTML5 canvas element
  const canvas = document.createElement("canvas");
  const ctx = canvas.getContext("2d");

  // Set the canvas dimensions
  canvas.width = 200;
  canvas.height = 50;

  // Create some text to render on the canvas
  const text = "Canvas fingerprinting test";

  // Render the text on the canvas
  ctx.textBaseline = "top";
  ctx.font = "14px 'Arial'";
  ctx.textBaseline = "alphabetic";
  ctx.fillStyle = "#f60";
  ctx.fillRect(125, 1, 62, 20);
  ctx.fillStyle = "#069";
  ctx.fillText(text, 2, 15);
  ctx.fillStyle = "rgba(102, 204, 0, 0.7)";
  ctx.fillText(text, 4, 17);

  // Extract the canvas image as a data URL
  const canvasDataUrl = canvas.toDataURL();

  // Return the data URL, which can be used as a fingerprint
  return canvasDataUrl;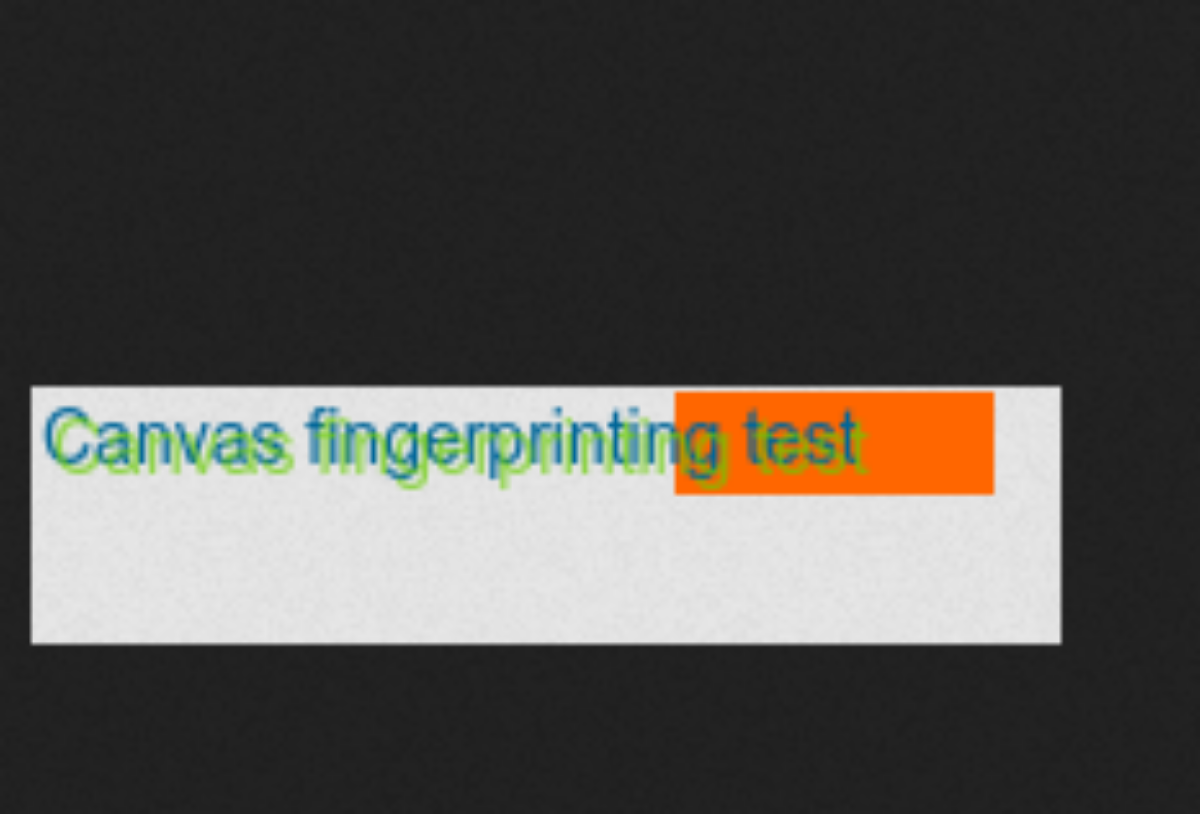
};This code creates a canvas element, renders some text on it, and then extracts the image as a data URL. This data URL can be used as a fingerprint. The generated fingerprint will look like this.
Next, we’ll create a file webgl.js which will contain the code to generate a WebGL fingerprint. Add the following code to this file.
// Check if the browser supports WebGL
const isWebGLSupported = () => {
  try {
    const canvas = document.createElement("canvas");
    return !!(
      window.WebGLRenderingContext &&
      (canvas.getContext("webgl") || canvas.getContext("experimental-webgl"))
    );
  } catch (e) {
    return false;
  }
};

// Create a function to generate a WebGL fingerprint
const generateWebGLFingerprint = () => {
  if (isWebGLSupported()) {
    const canvas = document.createElement("canvas");
    const gl =
      canvas.getContext("webgl") || canvas.getContext("experimental-webgl");

    if (gl) {
      const fingerprint = {
        vendor: gl.getParameter(gl.VENDOR),
        renderer: gl.getParameter(gl.RENDERER),
        maxAnisotropy: gl.getExtension("EXT_texture_filter_anisotropic")
          ? gl.getParameter(
              gl.getExtension("EXT_texture_filter_anisotropic")
                .MAX_TEXTURE_MAX_ANISOTROPY_EXT
            )
          : "N/A",
      };

      return JSON.stringify(fingerprint);
    }
  }

  return "WebGL not supported";
};

export const webGLFingerprint = generateWebGLFingerprint();In the above code, we first check if the browser supports WebGL. If it does, we create a WebGL context and extract the vendor and renderer information. We also check if the EXT_texture_filter_anisotropic extension is supported and extract the maximum anisotropy value. This information is then returned as a JSON string.
The generated WebGL fingerprint will look like this.
{
  "vendor": "Intel Inc.",
  "renderer": "Intel(R) Iris(TM) Plus Graphics 640",
  "maxAnisotropy": 16
}Now that we have all the code we need, we’ll create a file index.js which will contain the code to generate the fingerprint. Add the following code to this file.
import * as bsf from "./fingerprint.js";
import * as canvasFp from "./canvas.js";
import * as webglFp from "./webgl.js";

const generateFingerprint = async () => {
  const fingerprint = {
    UserAgent: bsf.getUserAgent(),
    IpAddress: await bsf.getIpAddress(),
    ScreenResolution: bsf.getScreenResolution(),
    ColorDepth: bsf.getColorDepth(),
    AvailableScreenResolution: bsf.getAvailableScreenResolution(),
    PixelRatio: bsf.getPixelRatio(),
    TimezoneOffset: bsf.getTimezoneOffset(),
    SessionStorage: bsf.getSessionStorage(),
    LocalStorage: bsf.getLocalStorage(),
    IndexedDB: bsf.getIndexedDB(),
    CookiesEnabled: bsf.getCookiesEnabled(),
    TouchSupport: bsf.getTouchSupport(),
    DoNotTrack: bsf.getDoNotTrack(),
    HardwareConcurrency: bsf.getHardwareConcurrency(),
    Platform: bsf.getPlatform(),
    Plugins: bsf.getPlugins(),
    PdfViewerEnabled: bsf.getPdfViewerEnabled(),
    ForcedColors: bsf.getForcedColors(),
    canvasFingerprint: canvasFp.generateCanvasFingerprint(),
    webGLFingerprint: webglFp.webGLFingerprint,
  };
  const fingerprintHash = await hashFuntion(fingerprint);
  return {
    fingerprint,
    fingerprintHash,
  };
};

const hashFuntion = async (fingerprint) => {
  const hash = await crypto.subtle.digest(
    "SHA-256",
    new TextEncoder().encode(JSON.stringify(fingerprint))
  );
  return Array.from(new Uint8Array(hash))
    .map((b) => b.toString(16).padStart(2, "0"))
    .join("");
};In the above code, we first import all the functions we created in the previous files. We then create a function generateFingerprint which calls all the functions and returns the fingerprint and its hash. The hash is generated using the SHA-256 algorithm.
Finally, we’ll create a file index.html which will contain the code to display the fingerprint. Add the following code to this file.
<!DOCTYPE html>
<html lang="en">
  <head>
    <meta charset="UTF-8" />
    <meta name="viewport" content="width=device-width, initial-scale=1.0" />
    <title>Fingerprint Data</title>
 <style>
      table {
 border-collapse: collapse;
 width: 100%;
 border: 1px solid #ddd;
 }

      th,
      td {
 text-align: left;
 padding: 8px;
 }

      tr:nth-child(even) {
 background-color: #e3effa;
 }
 #root {
 display: flex;
 flex-direction: column;
 align-items: center;
 background-color: rgb(215, 214, 212);

 }
    </style>
  </head>
  <body>
    <div id="root">
      <h1>Fingerprint Data</h1>
      <h3 id="fingerprint-hash" style="color: blue"></h2>
      <table>
        <thead>
          <tr>
            <th>Property</th>
            <th>Value</th>
          </tr>
        </thead>
        <tbody id="fingerprint-table">
 <!-- Table data will be dynamically generated here -->
        </tbody>
      </table>
    </div>
 <script type="module" src="index.js"></script>
  </body>
</html>To make the html code display the fingerprint data, we’ll add the following code to the index.js file.
// get the generated fingerprint
const { fingerprint, fingerprintHash } = await generateFingerprint();

const hash_h1 = document.getElementById("fingerprint-hash");
hash_h1.textContent = `unique Id: ${fingerprintHash}`;

const populateTable = () => {
  const tableBody = document.getElementById("fingerprint-table");

  for (const prop in fingerprint) {
    const row = document.createElement("tr");
    const propertyName = document.createElement("td");
    const propertyValue = document.createElement("td");

    propertyName.textContent = prop;

    if (prop === "canvasFingerprint") {
      // Create an image element for the canvas fingerprint
      const canvasFingerprintImage = document.createElement("img");
      canvasFingerprintImage.src = fingerprint.canvasFingerprint;
      propertyValue.appendChild(canvasFingerprintImage);
    } else {
      // For other properties, display the value
      propertyValue.textContent = fingerprint[prop];
    }

    row.appendChild(propertyName);
    row.appendChild(propertyValue);

    tableBody.appendChild(row);
  }
};

// Call the function to populate the table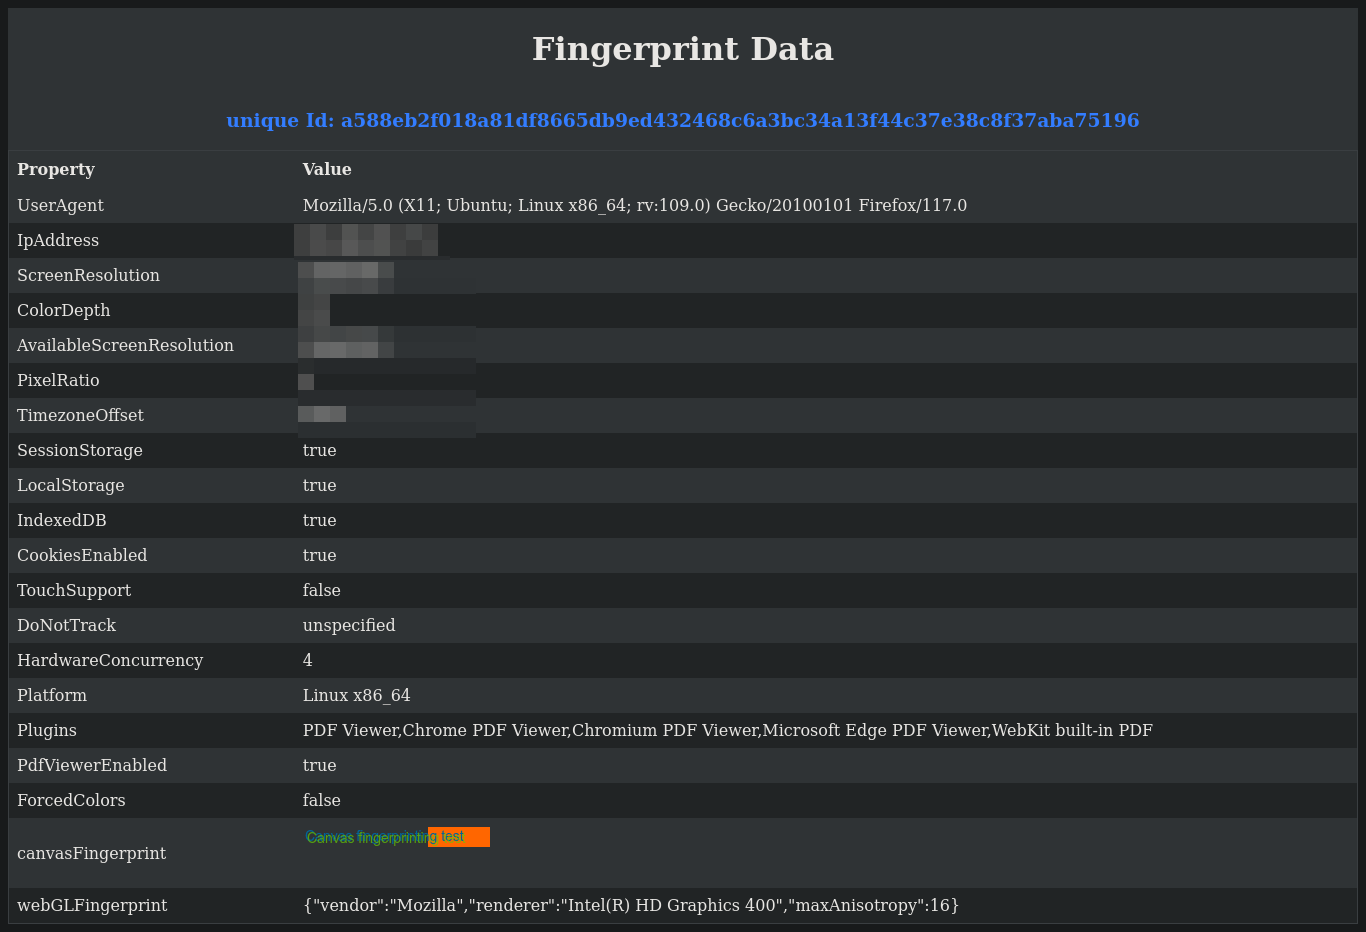
populateTable();Now that we have all the code we need, we can run the program by opening the index.html file in a browser. The generated fingerprint will look like this.
Some Notes
This code will produce a unique fingerprint for every browser and device. However, it is not persistent across the web or even locally as might be using a dynamic IP address or even a VPN.
Now that you have generated a fingerprint, you can map the fingerprint to a user account and use it to track the user across the web. You can also sell this data to advertisers and rake in some cash to repay your debtors.
Conclusion
In this article, we have discussed what browser fingerprinting is, how it works, and why it is used. We have also built a program that generates a browser fingerprint using JavaScript. You can find the codebase here on GitHub.
References
browser-fingerprinting-everything-you-need-to-know
fingerprint.com